
If your webcam suddenly shows a black screen or “Camera not found” right before a meeting, don’t panic. In most cases, the problem is software—a privacy setting, a conflicting app, or a disabled driver—not a dead camera. This guide walks you through a clear, step‑by‑step workflow to fix webcam issues fast on Windows and macOS, including what to do if a test on a tool like this simple online webcam test shows no image at all.
You’re seconds from a critical client call or virtual interview, and all you see is darkness. There’s nothing more awkward than spending ten minutes saying, “Can you see me now?” while frantically clicking through settings. The real cause is usually buried in hidden OS privacy toggles, driver handshake errors, or browser permissions that block your camera to protect security.
This guide is your step-by-step recovery checklist. We’ve analyzed the top webcam errors and failure points to create a concise, proven workflow. Whether you’re on Windows 11, macOS, or using a browser-based app like Zoom or Google Meet, you’ll learn
Table of Contents
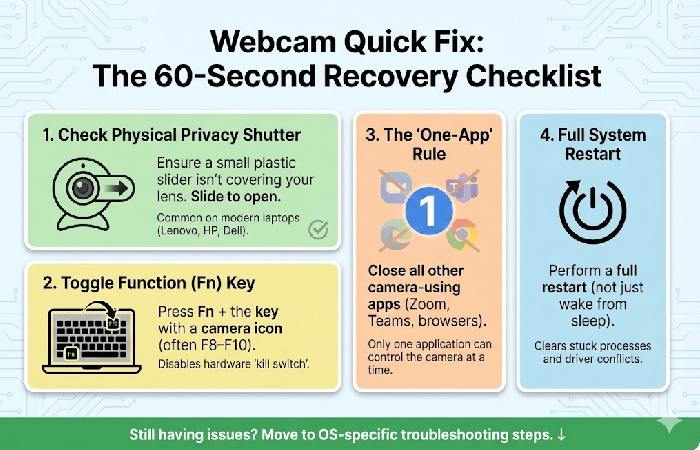
Quick Fix: The 60-Second Recovery Checklist
If you are in a rush, try these “sanity checks” first. They solve 80% of webcam failures:
-
The Physical Shutter: Check if a small plastic slider is covering your lens. Many modern laptops (Lenovo, HP, ASUS, Dell) have a sliding privacy cover or small switch near the lens.
-
The Function Key: Some laptops have a function key (often F8–F10 or a camera icon, sometimes with Fn) that disables the camera at hardware level. Press Fn + F10 (or the key with a camera icon) to toggle the hardware “kill switch.”
-
The “One-App” Rule: Close Zoom, Teams, and Chrome. Only one application can control the camera at a time.
-
Direct Plug: If using an external camera, bypass USB hubs and plug directly into the computer’s motherboard port.
- A full restart (not just wake from sleep) clears stuck camera processes and many temporary driver conflicts on both Windows and macOS.
If the camera is still dead or black, move into OS‑specific steps.
Key Takeaways: How to Fix a Webcam Fast
-
Check hardware kill‑switches: Open the physical privacy slider and make sure the camera function key/kill switch is turned on.
-
Verify privacy settings: In Windows, go to Settings > Privacy & security > Camera and turn on Camera access and app access; on Mac, allow apps under Privacy & Security > Camera.
-
Identify the error: If you see 0xA00F4244 (“NoCamerasAreAttached”), treat it as a detection/driver/BIOS issue rather than just an app glitch.
-
Close background apps: Only one app can usually use the webcam at a time, so close Zoom, Teams, Meet, Discord, and other video tools before retesting.
-
Refresh drivers: In Device Manager, disable then re‑enable or reinstall the camera driver to re‑establish a clean connection between Windows and the webcam.
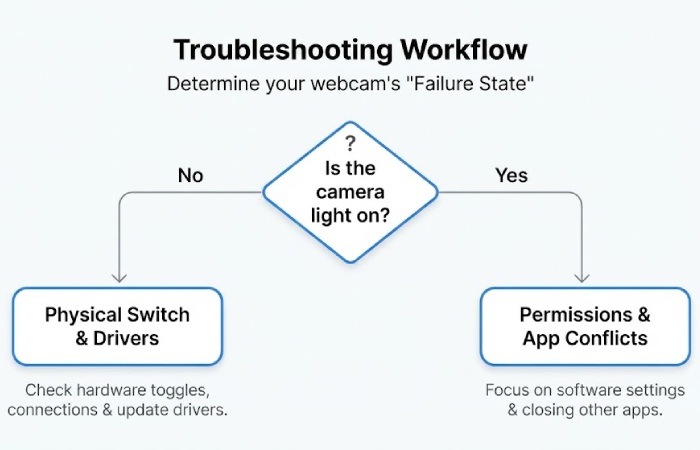
Step 1: Identify Your Webcam “Failure State”
You get better results once you know which bucket you are in:
-
Black screen, light on
-
The camera shows up in apps, the indicator light turns on, but the image is black, frozen, or badly glitched.
-
This usually points to permissions, an app conflict, a stuck process, or video settings.
-
-
“Camera not found” / device missing
-
Windows throws errors like 0xA00F4244, “NoCamerasAreAttached,” or “We can’t find your camera,” or macOS reports “no camera connected.”
-
That typically means drivers, firmware toggles, or hardware detection, not just app settings.
-
Keep that in mind as you work through Windows and macOS steps.
Step 2: Fix Webcam Issues on Windows 10/11
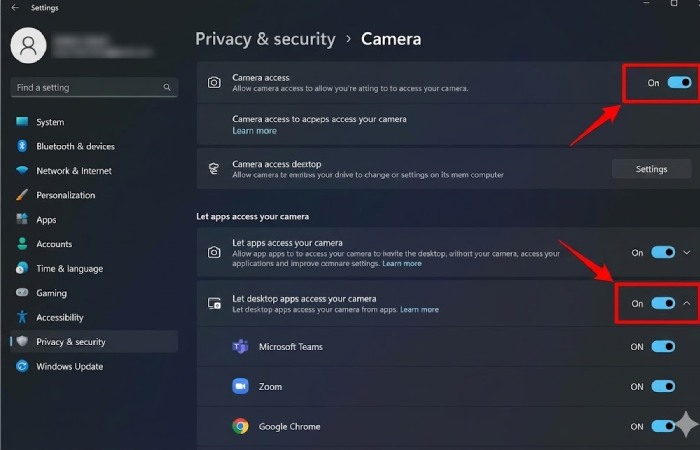
A. Check Windows camera privacy and permissions
Modern Windows builds can block your camera at the system level. Microsoft’s official camera guide treats privacy as the first thing to verify.
-
Open Settings > Privacy & security > Camera.
-
Make sure Camera access is On.
-
Turn Let apps access your camera On for Microsoft Store apps.
-
Scroll down and turn Let desktop apps access your camera On so desktop tools like Teams, Zoom, and browsers can see the camera.
If the camera works in the built‑in Camera app but not in Teams, Zoom, or Chrome, Microsoft notes that you are dealing with permissions or app‑level conflicts, not a dead webcam.
B. Use Device Manager to check and repair drivers
If your camera is missing or shows an exclamation mark, the drivers are next in line.
-
Right‑click Start > Device Manager.
-
Expand Cameras, Imaging devices, or Sound, video and game controllers.
-
If your webcam appears in the list:
-
Right‑click > Update driver > Search automatically for drivers to let Windows pull a newer version.
-
If problems started right after an update, open Properties > Driver and select Roll Back Driver when available; Microsoft and HP both highlight this as a fix when new drivers break cameras.
-
You can also try Disable device, wait a few seconds, then Enable device to refresh the driver handshake.
-
-
If updating does not help:
-
Right‑click > Uninstall device.
-
Restart your PC so Windows reinstalls a fresh default driver.
-
Lenovo, ASUS, and Dell all recommend the same basic pattern: confirm the device is recognized in Device Manager, enable it, and then update, roll back, or reinstall drivers if detection is flaky.
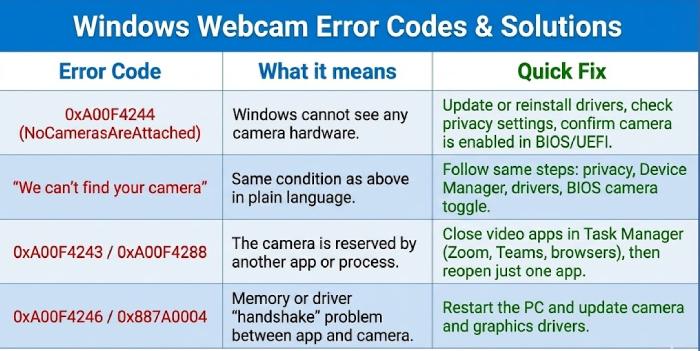
C. Understand common Windows webcam error codes
Here are some of the most common codes and what they actually mean.
| Error code | What it means | High‑authority guidance on the fix |
|---|---|---|
| 0xA00F4244 (NoCamerasAreAttached) | Windows cannot see any camera hardware. | Microsoft and Dell say to update or reinstall drivers, check privacy, and confirm the camera is enabled in BIOS/UEFI. |
| “We can’t find your camera” | Same condition as above in plain language. | Follow the same steps: privacy, Device Manager, drivers, BIOS camera toggle. |
| 0xA00F4243 / 0xA00F4288 | The camera is reserved by another app or process. | Close video apps in Task Manager (Zoom, Teams, browsers), then reopen just one app. |
| 0xA00F4246 / 0x887A0004 | Memory or driver “handshake” problem between app and camera. | Restart the PC and update camera and graphics drivers; Microsoft and vendors treat these as driver/stack issues. |
For this specific situation, Microsoft’s dedicated article on Camera app error 0xA00F4244 “NoCamerasAreAttached” confirms that Windows literally cannot see any attached camera and recommends the same privacy, driver, and BIOS checks outlined here.
D. Run built‑in Windows troubleshooting
-
Go to Settings > System > Troubleshoot > Other troubleshooters and run the Camera troubleshooter if available.
-
On Surface devices, Microsoft recommends the same troubleshooter plus optional firmware and driver updates through Windows Update or the Surface app.
E. Advanced Windows checks: BIOS and security
-
BIOS / UEFI camera setting
-
Some business laptops let you disable the internal camera in BIOS. Dell and Lenovo both tell users with persistent “no camera found” errors to confirm that the camera is enabled at firmware level.
-
-
Security and antivirus software
-
Certain security tools can silently block the webcam; vendor advice is to temporarily disable protection or whitelist your video apps to rule this out.
-
To validate these steps, the official Microsoft “Camera doesn’t work in Windows” guide walks through the same sequence of privacy checks, Device Manager diagnostics, the built‑in Camera troubleshooter, and driver reinstall options.
Step 3: Fix Webcam Issues on macOS (MacBook, iMac)
A. Update macOS and confirm camera permissions
Apple’s own camera help page starts with software updates and app permissions.
-
Open Apple menu > System Settings > General > Software Update and apply any pending updates.
-
Go to System Settings > Privacy & Security > Camera.
-
Turn on camera access for apps you actually use (FaceTime, Zoom, Teams, browsers, recording tools).
Apple’s own help article, “If the built‑in camera isn’t working on your Mac”, backs this up by prioritizing macOS updates, Privacy & Security > Camera permissions, and Screen Time restrictions before moving on to more advanced resets or hardware service.
If your Mac is using Screen Time, Apple also warns that app restrictions there can silently block the camera; check Screen Time > Content & Privacy > App Restrictions and make sure Camera is allowed.
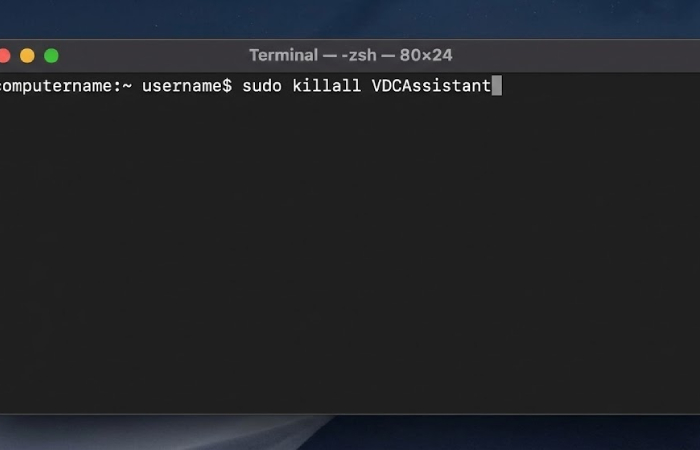
B. Kill stuck camera processes (black screen with light on)
When the green light turns on but the video is black or frozen, macOS camera processes sometimes hang.
-
Quit all apps that use the camera (FaceTime, Zoom, Teams, browsers).
-
Open Terminal (Applications > Utilities > Terminal).
-
Run:
sudo killall VDCAssistantand press Return. -
Run:
sudo killall AppleCameraAssistantif present. -
Enter your admin password if prompted, then reopen your camera app.
Independent Mac troubleshooting guides and Apple Community threads consistently show that restarting VDCAssistant/AppleCameraAssistant can revive a stuck camera without rebooting the entire Mac.
C. Restart or reset SMC (Intel Macs)
For Intel‑based Macs, Apple still lists the System Management Controller (SMC) as a component that can affect hardware behavior, including the camera. If the camera is still missing after permissions and process resets:
-
Restart your Mac if it has Apple silicon (there is no separate SMC).
-
For older Intel MacBooks and iMacs, follow Apple’s SMC reset instructions by model, then test the camera again.
If your camera still does not appear in System Information > Camera after these steps, Apple’s guidance is to contact support or book a hardware service, because at that point a hardware fault becomes likely.
Step 4: External USB Webcams (Windows and Mac)
A. Check the basics: power, ports, and cables
External webcams add another layer—USB power and bandwidth.
-
Plug the webcam directly into the laptop or desktop instead of a cheap, unpowered hub; high‑resolution webcams, especially 1080p/4K, draw more bandwidth and power than many hubs can reliably supply.
-
Try a different USB port (prefer USB 3.0 / 3.2 ports when available) and, if possible, a different cable.
-
Test the webcam on another computer to quickly tell whether the camera itself is failing.
B. Pick the right camera in your app
On both Windows and macOS, apps can see multiple cameras, but they only show one at a time.
-
In Zoom, Teams, and Google Meet, open Settings > Video and manually choose your external webcam from the list.
-
Some proctoring tools and conferencing platforms also have in‑app camera selectors; check those if the wrong camera is being chosen by default.
C. macOS‑specific notes for external webcams
-
Confirm your video app is allowed under System Settings > Privacy & Security > Camera.
-
If macOS does not detect the device at all, Apple and third‑party guides recommend checking it under Apple menu > About This Mac > System Report > USB to see whether the webcam shows up there; if it does not, test another port or adapter.
Step 5: When the Camera Works in an App but Not in the Browser
If your webcam works in the Windows Camera app or macOS Photo Booth but fails in Chrome, Edge, or another browser, the browser is blocking it.
Chrome, Edge, and other Chromium browsers
-
With the meeting site open, click the lock or camera icon at the left of the address bar.
-
Set Camera to Allow for that site.
-
Go to Settings > Privacy and security > Site Settings > Camera.
-
Pick your preferred camera from the dropdown.
-
Make sure the meeting domain (for example,
meet.google.comorteams.microsoft.com) is not under “Not allowed.”
-
Common Questions and Specific Symptoms
“Why is my webcam not detected at all?”
When the device does not show up, you are in “device not found” territory.
-
On Windows, Microsoft recommends:
-
Check privacy settings as above.
-
Open Device Manager to confirm if the camera appears under Cameras/Imaging devices.
-
Use Action > Scan for hardware changes and update or reinstall the driver if the device is missing or flagged.
-
-
On macOS, Apple suggests:
-
Update macOS and restart.
-
Confirm the camera exists in System Information under Camera.
-
If no camera is listed and SMC/permissions have been checked, arrange hardware service.
-
“Why is my webcam black even though the light is on?”
This usually means the camera is powered but the software path is blocked.
-
Double‑check app permissions in Windows and macOS camera privacy settings.
-
Close other apps that may still be holding the camera in the background.
-
On macOS, try the VDCAssistant/AppleCameraAssistant Terminal fix; on Windows, try restarting the app and, if needed, the Camera app to confirm the feed works there.
“Why does my camera work in one app but not another?”
If the camera works in Teams but not in Zoom (or vice versa), the hardware is fine.
-
Confirm the problematic app is allowed in Windows Camera privacy or macOS Privacy & Security > Camera.
-
In the app’s own settings, select the correct camera and close any other video apps that might be competing.
“Why is my webcam blurry or low‑quality?”
-
Clean the lens gently with a microfiber cloth; smudges and fingerprints are a very common culprit.
-
In your video app, raise the resolution or quality setting if the option exists.
-
Improve lighting in front of you—most guides note that poor light exaggerates grain and blur on laptop webcams.
“Why did my webcam stop working after a Windows update?”
-
Microsoft and OEMs see this often: a camera that worked before an update disappears or shows errors afterward.
-
Their recommended fix is to roll back or reinstall the camera driver in Device Manager and to re‑check privacy settings, because updates can reset app access.
“What if the camera light stays on when I’m not using it?”
-
Check which apps recently accessed the camera in Windows privacy settings or macOS Screen Time / Privacy; if you see something you do not recognize, close it and remove its access.
-
Security experts advise running a reputable anti‑malware scan if you suspect unauthorized camera use, since some malware families target webcams.
“Can I use my phone as a webcam if mine is broken?”
-
Yes. Many users now rely on software that turns iOS or Android phones into webcams over USB or Wi‑Fi, and big comparison guides show they often deliver better quality than built‑in laptop cameras.
Google’s Chrome help docs stress that a single “Block” click will persist across visits until you change it back, which is why cameras often “mysteriously” stop working only in the browser.
Conclusion
Most “broken” webcams come down to privacy settings, app conflicts, or drivers—not dead hardware. Work through the checks in this guide step by step, and if your camera still fails on multiple devices, it is time to think about repair or replacement.
When you reach that point, it’s worth following advice like this practical webcam support guide from Lifewire, which recommends checking the user manual for model‑specific troubleshooting and then contacting the manufacturer’s support team for deeper diagnostics and warranty options.